I have been celebrating Cinco de Mayo since I was in graduate school in Texas. This holiday commemorates the Mexican victory over French forces at the Battle of Puebla on May 5, 1862.
The day is actually more significant culturally here in the United States than it is in most of Mexico. Over the years, it has come to represent a time for celebrating Mexican heritage (and of course Mexican food) in this country.
For some Americans, Cinco de Mayo is primarily a drinking holiday. I’m not much of a drinker, but I am an eater. I like to prepare something Mexican or Tex-Mex on May 5. Sometimes I’m moved to make enchiladas. Other times I’ll just throw together a little guacamole.
This year I’m putting together a salsa based on a recipe from my cousin Mardi. I like to serve it as a sort of salad or side dish; it is satisfying with or without tortilla chips.
The term salsa, as readers may know, means sauce in Spanish. The Aztecs and the Mayans began preparing a type of salsa millennia ago. Their version apparently contained tomatoes, chiles, beans, and squash. The Spanish conquistadores took note of this tasty condiment in the 1500s and gave it its name.
Salsa was not part of mainstream U.S. culture until the mid- to late 20th century. In the 1940s, former college football star David Pace and his wife Margaret opened the first salsa manufacturing plant in Paris, Texas, making what Pace called “picante sauce.” (The Pace company’s salsa is still called this and is still popular.)
I think I would have liked David Pace, who died in 1993 at the age of 79. According to his obituary in “The New York Times,” he was known for more than his picante sauce business, which was sold to Campbell’s after his death for more than $1 billion.
“Mr. Pace also patented an executive chair in 1967 that could be opened flat for taking a nap,” the obituary noted.
My father, who insisted on installing a couch in his office in Rockefeller Center so that he could sleep for a few minutes every afternoon, would have approved. So do I; I have been known to take a cat nap myself.
In the latter part of the 20th century, Mexican foods and salsa in particular found their way into mainstream American cuisine. By the 1980s, salsa was available pretty much everywhere in this country, and in 1991 it surpassed stalwart catsup as Americans’ favorite condiment.
In 1998, it was deemed a vegetable by the U.S. Department of Agriculture so that it could be classified thus in school-lunch programs.
There is much to love in salsa. It’s generally healthy and low in fat yet high in flavor. Unlike ketchup, it is made up of identifiable foods and contains little or no sugar. It’s vegan and tastes fresh even when (as in the salsa below) most of the ingredients come from a can or the freezer.
It is also easy to make at home and infinitely variable. When I think of salsa, tomato comes to mind first and foremost. Nevertheless, I have made salsa by adding cilantro, lime juice, onion, and salt to many different fruits: strawberries, blueberries, peaches, mangoes, and pineapples.
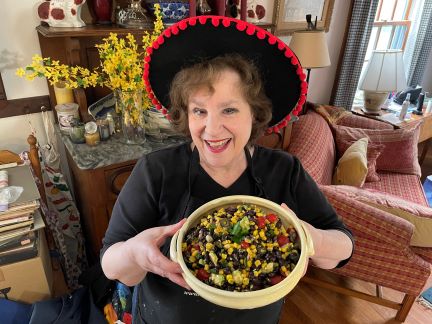
Mardi’s salsa adds a little protein to the mix by mixing in black beans. This type of salsa is often known as confetti salsa. It’s made up of small, discreet, colorful ingredients, just like confetti.
If you try it at home—and I encourage you to do so—think about adding flavors you like or have in the house. Some people throw in part or all of a can of green chiles. Some use a fresh jalapeño or some hot sauce for heat instead of the chipotle. Some eliminate the olives and add more beans. You can’t really go wrong.
One warning: This is the sort of recipe that absolutely depends on individual taste. I started with the amounts I mention in the formula below and then ended up adding quite a bit more cumin, chipotle, and lime juice.
The end product was spicy and citrussy and fabulous. I know not everyone likes spice, however. To employ a phrase I generally dislike but find appropriate when it refers to flavor, “you do you.”
If you don’t get around to making this dish until after May 5, never fear. All of May is National Salsa Month, so designated in 1997 to honor the 50th anniversary of Pace Picante Sauce.
Confetti Salsa
I find that the best way to chop herbs like the cilantro here is to wash and dry them, then place them in a sturdy, narrow container like a juice glass and cut them with clean kitchen shears.
Ingredients:
1 can (15.5 ounces) black beans, rinsed and drained
1-1/2 cups corn kernels (In summer these would be fresh; at this time of year I put frozen kernels in a colander and let them defrost and drain.)
1 4-ounce can pitted ripe olives, drained and cut into little rounds (If all you can find is a 6-ounce can, either save some olives for another occasion or go ahead and use the whole can.)
at least 25 grape or cherry tomatoes, halved
1 very small red onion, or part of a larger one, diced
1 handful cilantro, chopped
1-1/2 teaspoons salt
dried chipotle chile powder (Start with 1/4 teaspoon.)
cumin seeds, or ground cumin if that is all you have (Start with 2 teaspoons.)
the juice of 1 to 2 limes (Start with 1 and then add more as needed; I used 1-1/2 most recently.)
1 splash olive oil, plus more as needed
1 avocado, cut into chunks
Instructions:
In a medium bowl, combine the beans, corn, olives, tomatoes, onion pieces, and cilantro. Mix well. Sprinkle the salt, chipotle, and cumin seed on top; then blend in the lime juice and the olive oil. Try the salsa and add more chipotle, cumin, oil, and lime juice to taste.
If you’re eating the salsa soon after you make it, add the avocado chunks along with the other vegetables and fruits. Otherwise, refrigerate the salsa until you’re ready to serve it, and then stir in the avocado. That method avoids discoloration of this delicate fruit.
Serves 4 to 6 as a salad or a small party as a dip.