Archive for the ‘The Twelve Cookies of Christmas’ Category

Strawberry Key-Lime Bars

Wednesday, June 30th, 2010

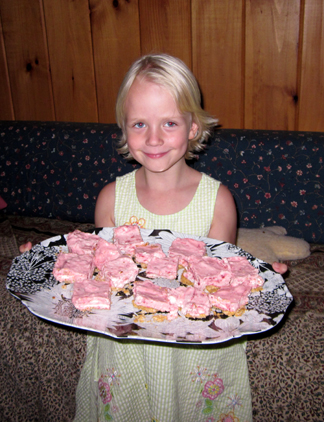
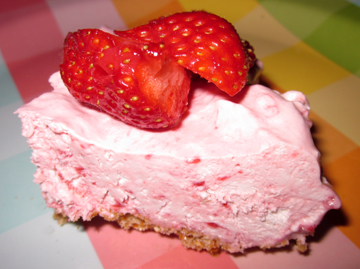
I know! This looks more like a wedge than a bar. It was a corner piece…….

 
This cool and cooling dessert fulfills TWO functions on my blog today!
 
First, it represents June (just in the nick of time!) for my Twelve Cookies of Christmas series.
 
Second, it pays homage to the Mass Farmers Markets Strawberry Dessert Festival, which will run through July 4 at 50 locations throughout the Commonwealth of Massachusetts.
 
Chefs in restaurants and markets are getting creative with strawberries and donating a portion of the desserts’ revenues to the Federation of Massachusetts Farmers Markets, which supports farmers and markets statewide. 

The closest participating restaurants are in Northampton, about an hour away from me. So I’m contributing to the festivities with a homemade (and home enjoyed) strawberry dessert.

 
The idea for this particular dessert came from the manufacturers of my go-to key-lime juice, Nellie & Joe’s.
 
I have to admit that I’m ambivalent about whipped topping (a.k.a. Cool Whip). Part of me loves the idea of eating something that resembles whipped cream (sort of) and getting by with very few calories.
 
Another part of me thinks about the ingredients and shudders. Basically, as you probably know, the stuff contains corn syrup, chemicals, and air.
 
I compromise with my principles by not eating it very often. My mother (who likes these bars very much, by the way) taught me to follow a path of moderation whenever possible.
 
Someday I may try making a key-lime pie with fresh strawberries and eschew the whipped topping.
 
In warm weather it was very handy to make this no-bake dessert, however.
 
So here are the bare bars. 

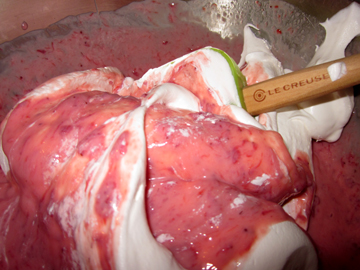
One word of warning: Be careful during the folding process not to hold anything slippery. As I was attempting to take a photo of the folding process, my little pink camera slid right in. SO FAR it appears to have survived. Luckily, the bars are pink so any staining that might have occurred is not discernible.

 
The Bars
 
Ingredients:
 
2 cups cut-up strawberries
1/4 cup sugar
1 smidgeon butter
1/2 cup (1 stick) butter
1/2 cup sugar
2 cups crushed graham crackers or pretzels (If you choose to use the pretzels—which give the bars a nice salty crunch—be sure to crush these pesky critters in a food processor; you need to get them as fine as possible. You can also use a Gluten Free Soft Pretzel Baking Mix if you’re allergic to gluten. I may actually have quit a little early!)
1 14-ounce can sweetened condensed milk
1/ 2 cup key-lime juice
8 ounces whipped topping, cold but not frozen
 
Instructions:
 
The day before you want to make the bars combine the strawberries and sugar in a saucepan. Let them sit until they juice up (an hour will probably do).
 
Bring the strawberry mixture to a boil, and stir in the butter. Reduce the heat and simmer until the strawberries are jam-like but not completely solid, stirring from time to time. The time needed will depend on the juiciness of your strawberries and the degree of heat your stove emits on “low”; my fairly firm berries and gas stove took about half an hour.
 
Remove the mixture from the heat and stir for five minutes, breaking up pieces of strawberry if they remain. Refrigerate the mixture overnight.
 
The next day line a 9-by-13-inch pan with foil. Melt the butter. Add the sugar and cracker or pretzel crumbs, and press the mixture into the pan. Set aside.
 
Beat together the strawberry mixture, condensed milk, and key-lime juice. Fold in the whipped topping. Mix thoroughly but gently.
 
Use a spatula to spread the strawberry mixture on top of the crumb crust. Cover the pan carefully (avoid hitting the top of the bars with your cover!) and freeze the mixture for 6 hours or overnight. 

Let the bars stand at room temperature for 15 minutes before slicing and serving. Makes 24 or more bars, depending on how small you slice them. 

It pains me to admit it, but my young friend Audrey looked much cuter holding the bars than I did.

If you enjoyed this post, please consider taking out an email subscription to my blog. Just click on the link below!

Subscribe to In Our Grandmothers’ Kitchens by Email.

Cookie Catastrophe

Thursday, May 27th, 2010

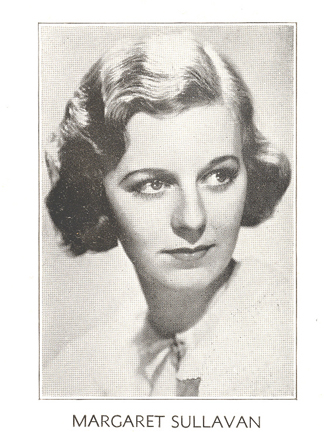
This is the photo that appeared with Margaret Sullavan's alleged recipe. Jake Jacobs estimates that it was published around 1938.

 
I recently purchased a CD called Hollywood Cooks! from Kathleen O’Quinn Jacobs and her husband Jake. Collectors and vendors of movie memorabilia, the two have scanned recipes and food-related stories from myriad old movie magazines.
 
Naturally, I felt the need to try one of the recipes—and since it was almost the end of the month and I hadn’t yet posted a “Twelve Cookies of Christmas” recipe I decided to share with you the recipe for Margaret Sullavan’s peanut-butter hermit cookies.
 
Or not.
 
Here’s what happened: I made the hermits yesterday. They were absolutely the easiest cookies I’ve ever made, featuring very few ingredients: condensed milk, peanut butter, and graham-cracker crumbs (plus a little salt). They shaped up very nicely on the baking pan.
 
Unfortunately, they didn’t pass muster in terms of taste.
 
Even my mother, who at 91 eats cookies at a rate that belies her slenderness, passed by the cookie jar (which I placed out in the open hoping she would eat some of the darn things) without even stopping.
 
She may not be able to articulate where she is or who I am all the time, but her brain retains information about pets and cookies very well. She never forgets our dog Truffle’s name. And she remembered that she didn’t like this recipe.
 
The problem has got something to do with the condensed milk, I think. It renders the texture a bit rubbery. And frankly the cookies just don’t offer enough peanut-butter flavor. Or flavor of any kind.
 

This probably makes sense. Actress Margaret Sullivan (1909-1960) is delightful in such films as The Shop Around the Corner (1940) with Jimmy Stewart. And she’s touching in No Sad Songs for Me (1950), in which her character gets ready for death in a romanticized preview of Sullavan’s own early demise. 

Sullavan with James Stewart

 
Nevertheless, nowhere in her daughter Brooke Hayward’s family memoir Haywire or in Lawrence Quirk’s biography Margaret Sullavan: Child of Fate did I find any reference to this mercurial actress’s skill in the kitchen. She probably never actually baked a hermit in her life.
 
In order to salvage my cookie post and not abandon Sullavan entirely, I am sharing a recipe that relies on her three main ingredients (plus a couple of additional ones!). I got the idea from Borden’s Eagle-brand web site, which features a number of recipes that involve condensed milk.
 
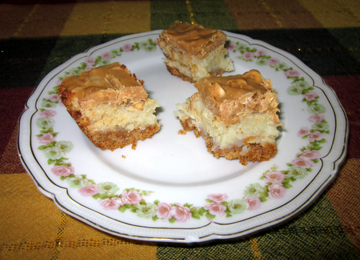
I don’t know whether Margaret Sullavan would have approved—but I’m sure that Brooke Hayward would have enjoyed my non-hermits as a child! A relative of the ever popular Hello Dolly Bars, also known as Magic Bars, they’re VERY sweet and chewy.
 
My mother LOVES them.
 
Please keep your fingers crossed for me as I move on to my next movie-star dish…….. 
 

Before I get to my recipe, here is Miss Sullavan’s version:
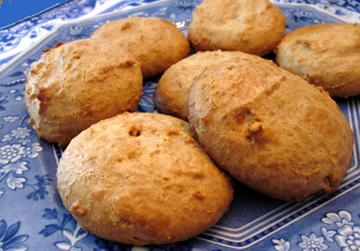
 
Margaret Sullavan’s Peanut Butter Hermits
 
Ingredients:
 
1 cup sweetened condensed milk (a little less than a 14-ounce can)
6 tablespoons peanut butter
1/4 teaspoon salt
3/4 cup graham cracker crumbs
 
Instructions:
 
Thoroughly blend together the milk and peanut butter. Add salt and graham cracker crumbs. Mix well. Drop by spoonfuls (I used a 2-tablespoon scoop) onto a buttered baking sheet (I used two). Bake 15 minutes, or until brown, in a moderately hot oven (375 degrees). Makes eighteen hermits.
 
NOT Margaret Sullavan’s Peanut Butter Hermits
  
Ingredients:
 
1/2 cup (1 stick) sweet butter
1-1/2 cups graham-cracker crumbs
2-1/2 cups sweetened flaked coconut
1 cup salted peanuts (optional but good for crunch and peanut flavor)
1 can (14 ounces) sweetened condensed milk
1-1/4 cups peanut-butter chips
2/3 cup peanut butter (I used chunky)
 
Instructions:
 
Preheat the oven to 350 degrees. Line a 9-by-9-inch pan with aluminum foil, and butter the foil generously.
 
In a saucepan melt the butter. Blend in the graham-cracker crumbs, and press the crumb mixture into the bottom of the pan and up the sides an inch or so.
 
Place the coconut on top of the graham-cracker crust. Throw on the peanuts if you are using them. Pour the condensed milk over all.
 
Bake this mixture for 25 to 30 minutes, or until it browns lightly.
 
While you are baking, use a double boiler to melt the chips and peanut butter together. Gently stir this mixture over the baked mixture.
 
Cool the bars on a wire rack for 15 minutes; then cover them with foil and refrigerate until the chocolate is set. (In my kitchen on a hot day this took more than 2 hours.)

Cut the baked stuff into bars. Makes between 16 and 60 little squares, depending on how big you want to cut them.
If you enjoyed this post, please consider taking out an email subscription to my blog. Just click on the link below!

Subscribe to In Our Grandmothers’ Kitchens by Email.

Cookie Emergency

Wednesday, April 28th, 2010

 
Uh oh!
 
I realized a couple of days ago that the month was fast a-waning and I hadn’t yet published a “Twelve Cookies of Christmas” recipe for April.
 
So I had to make cookies. Naturally, my family was devastated. Nevertheless, we valiantly forced ourselves to eat them.
 
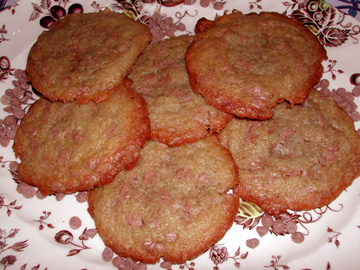
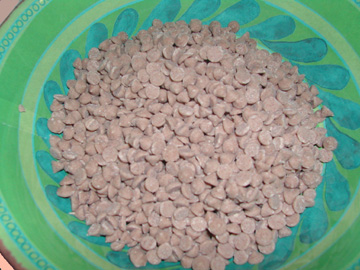
I recently ordered some cinnamon mini-chips from King Arthur Flour for making scones (that recipe will be posted next week). I threw some into a basic cookie recipe.
 
The resulting treats were lovely. The chips are so tiny that the cinnamon flavor is a bit subtle—but I love subtle! Next time I may try them in oatmeal cookies.
 
This version would make a tasty addition to any May Basket you might be planning to deliver to a special someone on Saturday!
 
Cinnamon Chip Cookies
 
Ingredients:
 
1/2 cup (1 stick) sweet butter
1/2 cup light brown sugar, firmly packed
1/4 cup sugar
1 egg
1/2 teaspoon baking soda
1/2 teaspoon salt
1 cup plus 2 tablespoons flour (I used half all-purpose and half white whole wheat)
1 teaspoon vanilla
1 cup cinnamon mini-chips
 
Instructions:
 
Preheat the oven to 375 degrees.
 
Cream together the butter and the sugars. Beat in the egg and mix thoroughly.
 
Beat in the baking soda and salt; then stir in the flour, followed by the vanilla and the chips.
 
Drop teaspoons of dough onto an ungreased (or parchment covered) cookie sheet. Bake for 10 to 12 minutes, until the cookies brown around the edges.
 
Makes about 20 cookies. This recipe may be doubled.


If you enjoyed this post, please consider taking out an email subscription to my blog. Just click on the link below!

Subscribe to In Our Grandmothers’ Kitchens by Email.

Sue’s Swedish Brown Cookies

Tuesday, March 9th, 2010
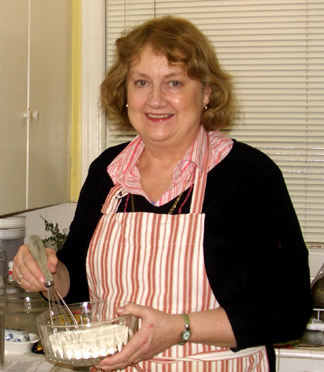
Sue Haas in the Kitchen

Sue Haas in the Kitchen

 
Here is the fourth installment in my Twelve Cookies of Christmas series. These brown cookies (they derive their color from caramelization of the sugar) will banish your March blahs.
 
The recipe comes from Sue Haas in Seattle, Washington, a regular reader of this blog and the dear sister of my dear minister, Cara Hochhalter. Sue writes children’s books when she isn’t working on art sales and appraisals. She says the recipe originated with her friend Marilynn Pray.
 
Sue and her daughter Alysa are busy planting a garden together. (I AM SO JEALOUS! We still have snow in the northeast!) Alysa writes about gardening and cooking on her own blog, Grass-Fed Goat.
 
The photos on this post come courtesy of Sue and Alysa, although I did test the recipe. (I felt it was my sacred duty.) The cookies taste of butter and honey: what could be better? Next time I may try them with maple syrup instead of the honey. After all, March is Maple Month!
 
Sue uses C&H Baker’s Sugar for the “fine baking sugar” (a.k.a. superfine sugar) called for in the recipe. I was in a hurry and didn’t have time to go to the store for superfine sugar so I put regular sugar in my blender and pulsed. It needed a little sorting through (the pulsing left a few clumps), but after the sorting it was an acceptable substitute.
 
Enjoy the cookies. I hope you’re thinking about your own garden….
 
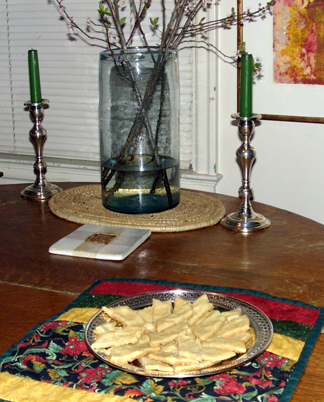
Cookies_tableweb
 
The Cookies
 
Ingredients:
 
1/2 cup (1 stick) sweet butter at room temperature
1/2 cup fine baking sugar
1/2 teaspoon baking soda
1 cup flour
3 teaspoons honey (plus a small amount more if needed)
 
Instructions:
 
Preheat the oven to 300 degrees. Line a large cookie sheet with parchment paper or a silicone baking mat. Cream together the butter and sugar; then beat in the baking soda. (Sue actually whisks the soda into the flour, but I added it by itself.) Add the flour and continue to mix lightly until combined.
 
Drizzle the honey into the flour and sugar/butter mixture and stir. The dough will stick together a bit better with the honey added. You may need to add a little more honey to make the dough hold together. Form the dough into a large “softball” shape with your hands. Divide it into two pieces.
 
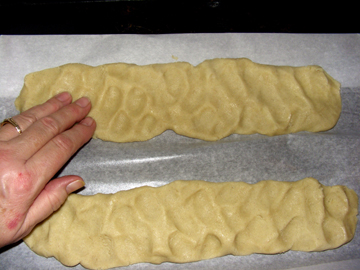
Roll and pat one of the pieces of dough onto the parchment on one long side of the pan into a long, flattened 12-inch “snake,” smushing the dough with your fingers so that it forms an even flat piece, about 2 to 3 inches wide and about 12 inches long.
 
Do the same with the second piece of dough placed several inches apart on the same sheet from the first piece. You will have two long, flat shapes of dough on one cookie sheet.
 
2 Flattened snakesweb
 
Bake the snakes until the dough is golden brown. (Sue estimated this at 15 to 20 minutes; it took a little longer in my oven.)
 
Check the dough after about 12 minutes. Take the cookies out earlier, or when they are only light brown, if you want a softer cookie. (I liked them crisp.)
 
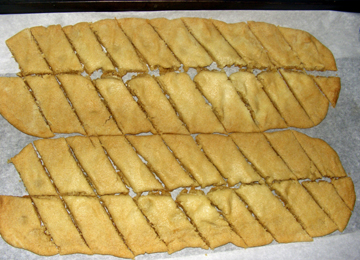
Remove the cookie sheet from the oven. Let it cool for only 2 to 3 minutes. While the dough is still warm cut a long line down the center of each snake-shaped piece. Then cut each “snake” diagonally at about one-inch intervals to make 3-inch long cookie strips.
 
diagweb
 
If you’d rather make really long diagonal strips (about 5- to 6-inch-long cookie strips), omit making the vertical cut down the center of each snake. That would reduce the total number of finished cookies by half. OR cut each 3-inch cookie strip in half to make tiny 1-1/2-inch-long bite-size pieces to feed a big crowd.
 
“Light, buttery, and delicious,” says Sue of her cookies.  Makes 20 to 40 cookies, depending on how you cut them.
Alysa and Sue

Alysa and Sue


If you enjoyed this post, please consider taking out an email subscription to my blog. Just click on the link below!

Subscribe to In Our Grandmothers’ Kitchens by Email.

Heart-y Cookies

Sunday, February 14th, 2010

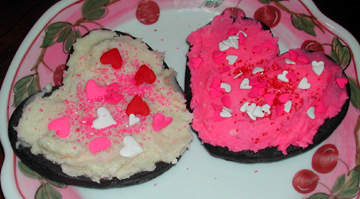
heart cookiesweb

 
Happy Valentine’s Day!
 
Naturally, I have something chocolaty for this month’s installment in my Twelve Cookies of Christmas series.
 
Today’s chocolate sugar cookies were cut into hearts (although they could certainly be trees or stars or reindeer in December) and iced with a basic butter icing.
 
They tasted wonderful.
 
Royal icing would have been prettier and easier to transport than the butter version we used on the cookies—but royal is harder to make and harder to keep. It has to be used right away or it dries out.
 
I wanted my icing simple and foolproof to use because I had a vision of a bunch of children happily decorating and eating cookies—a vision that came true.
 
cookie joyweb
 
My nephew Michael and his friends in Virginia have been snow crazy this week. No one has been to school. Sleds and snowballs have replaced electronic games (well, almost).
 
We called around the neighborhood a couple of days ago and asked whether anyone would like to take a break from the snow and come decorate cookies.
 
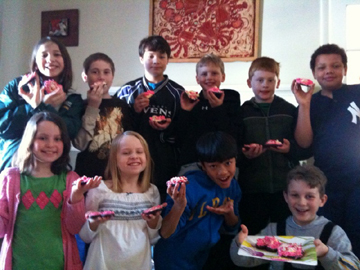
We ended up with eleven joyful children gathered around the kitchen table slathering icing and tossing sprinkles around.
 
The resulting cookies were heavily decorated. (We actually ended up making a double batch of icing to make sure there was enough.)
 
And they were VERY popular. The pictures above and below were taken with a cell phone (my battery ran out of steam at the critical moment) so they’re a little fuzzy, but you can see that our gang had a really good time. One of them was camera shy so we have only ten in the group photo.
 
If you enjoy these cookies half as much as the kids did, you’ll be happy indeed………
 
kidswithcookiesweb
 
Chocolate Sugar Cookies
 
Ingredients:
 
for the cookies:
 
1 cup (2 sticks) sweet butter at room temperature
1-3/4 cups sugar
2 eggs at room temperature
1 teaspoon baking powder
1/2 teaspoon salt
2/3 cup Dutch-process cocoa
2 teaspoons vanilla
3 cups flour
 
for decoration:
 
1 recipe (2 if you MUST) butter icing (see below)
lots of festive sprinkles
 
Instructions:
 
Cream together the butter and the sugar. Beat in the eggs, 1 at a time, beating well after each addition. Blend in the baking powder, salt, and cocoa, followed by the vanilla. Stir in the flour.
 
Chill the resulting dough, covered, for 1 hour. Preheat the oven to 350 degrees.
 
On a nonstick surface (a silicone mat or a marble board) pat the dough out to a thickness of 1/4 inch. Cut it into the desired shapes.
 
Bake the cookies on parchment- or silicone-lined cookie sheets for 10 to 12 minutes. They should be solid but not rock hard.
 
Let the cookies cool on the sheets for a couple of minutes before removing them to a rack to cool. Let them cool completely before frosting them with butter frosting (see below) and sprinkling the heck out of them.
 
Makes about 2 dozen cookies.
 
Butter Icing
 
Ingredients:
 
1 cup (2 sticks) sweet butter at room temperature
confectioner’s sugar to taste (probably between 1 and 2 cups)
2 teaspoons vanilla
milk if necessary to stir
a couple of drops of food coloring (optional—I used my sister-in-law’s Wilton food coloring, which was excellent; I’ll have to get some!)
 
Instructions:
 
Beat the butter until it is fluffy; then add confectioner’s sugar. Beat in the vanilla. Add milk and/or more confectioner’s sugar until the icing is spreadable.
 
Truffle wasn't allowed to eat any cookies, but she loved being with the kids anyway. They are all her Valentines.

Truffle wasn't allowed to eat any cookies, but she loved being with the kids anyway. They are all her Valentines.


If you enjoyed this post, please consider taking out an email subscription to my blog. Just click on the link below!

Subscribe to In Our Grandmothers’ Kitchens by Email.