Michael eyes a BOLT.
In general I’m not a big fan of sandwiches—mostly because I spend so much of my life avoiding carbohydrates. Carbs are pretty much de rigueur in a sandwich. In fact, I just learned that a Boston court ruled in 2006 that a sandwich involves two pieces of bread not only by definition but BY LAW.
Nevertheless, this has been a crazy summer, and sandwiches have prevailed in our household despite my normal carbophobia. This trend has been exacerbated by the proximity of my nine-year-old nephew Michael, who is staying with his parents down the street.
Michael can eat a sandwich at any meal (or even as a between-meal snack). Sometime soon I’ll go back to salads and soups, or I’ll end up as big as a house. In the meantime I’m joining Michael in his sandwich consumption and enjoying myself.
Sandwiches historically served as a convenience since they did away with the need for dishes and flatware and were quick to prepare. To some extent they still appeal because of their simplicity. When Michael comes in from swimming it’s easy to slice a little bread; find some meat, veggies, and/or cheese; and call the resulting combination lunch or supper. (I confess: once in a while it’s breakfast, too.)
Sandwiches are a terrific way to let seasonal produce star. Michael’s very favorite sandwich is one we make only at this time of year—the BLT. There just isn’t any point in combining bacon, lettuce, and tomato unless farm-fresh tomatoes are in season; winter imports need not apply.
If you have a favorite summer sandwich, please let me know what it is by commenting below. Meanwhile, I’m sharing recipes and photos from a recent BLT night at our home. My mother, sister-in-law Leigh, and Michael helped me start sandwich bread. My friend (and former cooking student!) Chas Fox stopped by just in time to help knead.
When it was time to eat, Chas’s son Matt helped make mayonnaise for the sandwiches. The bacon was the thick-cut variety from Avery’s Store in Charlemont, Massachusetts. The lettuce came from Chas’s garden, and we bought the tomatoes at our newest local farm stand, Hager’s Farm Market in Shelburne. (We don’t have fresh tomatoes in our gardens in the hills yet.)
At the last minute Chas observed that a little thinly sliced red onion might make a tasty addition to the sandwiches—and so the BOLT was born. I highly recommend it.
If you’re serving vegetarians, substitute extra-sharp cheddar cheese for the bacon in your sandwiches. You’ll have a COLT.
Our BOLT evening was delightful. Jack from across the street (minus his Betsy, who was toiling in the big city) brought a bottle of red wine. We sat on the porch with a few fairy lights and excellent company for illumination. New and old stories were told, and many sandwiches were consumed.
Family, friends, and simple food are an unbeatable combination–in summer or any other season.

Chas kneads.
BOLTs
Obviously, you may make your BLTs or BOLTs with store-bought bread and commercial mayonnaise. They are divine with homemade products, however, so that’s what I used.
Ingredients:
homemade bread as needed (see recipe below)
homemade mayonnaise, with or without basil (see recipe below)
lots of cooked, thickly sliced bacon
sliced ripe tomatoes (don’t even bother if they’re not fresh)
thinly sliced red onion (just a few slices per sandwich: less is definitely more in this case!)
Instructions:
Toast the bread if you want to. (Many BLT connoisseurs insist on this, although homemade bread is pretty fabulous untoasted.) Assemble sandwiches as generously as you like. Watch your guests smile.
White Bread for BOLTs
(or any other sandwich)
This recipe is adapted from King Arthur Flour’s basic sandwich loaf. That bread is excellent all by itself, and I highly recommend it. I wanted to make two loaves instead of the one it provides, however, since I tend to serve a lot of people at this time of year. And I cut back just a bit on the butter and sugar.
The amounts of those below still make a loaf that is rich, sweet, and easy to cut. In wet weather (and we’ve had no other kind lately) it takes quite a while to rise. It is worth the wait.
Ingredients:
1 packet active dry yeast
1/4 cup lukewarm water
2 tablespoons sugar
1 cup milk
1 cup hot tap water
1/4 cup (1/2 stick) unsalted butter, melted
6 cups flour (all-purpose and/or bread; you may also add a bit of white whole wheat here for extra whole-grain goodness), plus a bit more for kneading
2 teaspoons salt
Instructions:
First, proof the yeast in the lukewarm water in a small bowl, along with 1 tablespoon of sugar. This will take about 5 minutes.
Combine the milk, hot water, and warm melted butter. In a large separate bowl, combine the flour, salt, and remaining sugar. Briskly stir in the dissolved yeast and the liquids.
Place the dough on a lightly greased or floured surface, put a little oil on your hands, and knead the dough for 8 minutes, until it feels just right. You may add a little more flour as you knead, but try not to add too much.
Transfer the dough to a greased bowl and cover it with a damp towel. Let it rise until it puffs up and just about doubles in bulk. This may take as little as an hour—but in our recent extremely damp weather it has been taking a lot longer in my kitchen!
Butter two loaf pans. Gently deflate the dough with your hands, and cut it in two with a serrated knife. Place each half in turn on an oiled board, and shape it into an 8-inch log. Place the logs in your loaf pans, and cover them loosely with lightly greased plastic wrap. Allow them to rise to a nice height. (Mine didn’t soar too high because of the humidity, but eventually they did rise respectably.)
Bake the loaves in a preheated 350-degree oven for 35 to 40 minutes, until they are a light golden brown. I like to remove them from the pans for the last 5 minutes or so and let the crust crisp up a tiny bit in the oven. Makes 2 loaves.

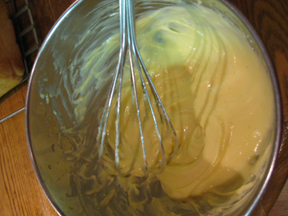
Mayo in the Making
Homemade Mayonnaise
Life is full of risks. I say this to remind readers that eating raw eggs ALWAYS carries a very small risk of salmonella. If you or your guests worry about this problem, there are a couple of things you can do.
First, you can buy pasteurized eggs. The disadvantage here is that you can’t use fresh local eggs, which I always prefer. (I like to buy them from my neighbors who have chickens!)
You can also try to pasteurize your own eggs. I have found several web sites that list ways in which you can semi-cook your eggs and/or yolks. I haven’t actually tried them but provide a link or two for your reading. Some involve the microwave; others, cooking the eggs with a little liquid for a few minutes or even by themselves. I think I may try one of the non-microwave techniques next time. On the evening of our party I used raw yolks, and luckily everyone is still alive.
ANYWAY, on to the recipe. If you’re worried, skip it and use commercial mayonnaise. The homemade stuff awfully good, however. It’s easiest to make with two people—one to add the oil and one to whisk.
Ingredients:
1 fresh egg yolk at room temperature (I keep it refrigerated until almost the last minute to minimize risk of illness and then plunge it into very warm water for a couple of minutes to bring it to the right temperature)
1/2 teaspoon Dijon mustard
1/2 teaspoon salt
1 pinch cayenne pepper
1 tablespoon freshly squeezed lemon juice
3/4 cup canola oil
a tablespoon or two of boiling water if needed
finely chopped herbs (optional; basil is nice in the BOLTs)
Instructions:
Place the egg yolk, mustard, salt, cayenne, and lemon juice in a clean bowl, and combine them thoroughly with a whisk. Whisk in the oil a drop at a time. As the sauce begins to thicken, you may add slightly larger drops, but don’t get carried away; this is a slow process.
If the sauce becomes too thick or starts to curdle, whisk in a small amount of boiling water. When the mayonnaise is nice and thick, add the herbs if desired and serve. Leftover mayo may be kept in the refrigerator for a few days. Makes about 1 cup.

Matt and Truffle needed to relax after making mayonnaise--and eating BOLTs.


