Posts Tagged ‘Tinky on TV’

Strawberry-Rhubarb Non-Pie

Thursday, June 9th, 2022

I tend to celebrate National Strawberry-Rhubarb Pie Day, which falls each year on June 9, because I love food holidays.

I also celebrate this day because I adore dishes that pair sweet and tart. Strawberries in full season generally need no sugar. I can’t say the same of rhubarb. The two ingredients thus complement each other to some extent.

As food writer Judith Fertig has written, “Bitter rhubarb [makes] sunny-day strawberry face the realities of life—and taste all the better for it.”
The strawberry-rhubarb combination also works because it is truly multicultural and international.

Actually a vegetable rather than a fruit, rhubarb comes from a variety of countries but is perhaps best known as a Chinese import. It was originally used for medicinal purposes but eventually evolved into a food, helped out in large part by the widespread availability of sugar beginning in the 19th century.

Ornamental strawberry plants have been found worldwide for millennia. According to the University of Vermont Agricultural Extension Service, the varieties of this berry that we consume came from the Americas, where indigenous peoples ate and cooked with strawberries long before Europeans arrived in the New World.

Eventually, both the North American Virginia strawberry and the Chilean strawberry were brought to Europe. There the French and English bred them together to resemble what we think of as a strawberry today.

Combining strawberries and rhubarb, then, is a truly global enterprise … not unlike the United States.

Despite these positive traits, I don’t find Strawberry-Rhubarb Pie Day a perfect holiday.

For one thing, it was obviously invented by someone in New Jersey or Connecticut, where strawberries come early in June.

We are close to strawberry season here in western Massachusetts. Nevertheless, even in this very warm spring we haven’t quite reached that season. At any rate, we haven’t reached it in my hilly hometown of Hawley, where most seasons arrive late.

I am also a little suspicious of this holiday because in my opinion the combination of strawberries and rhubarb is overblown.

All too frequently, when I tell people that I adore rhubarb, they respond by telling me that they love strawberry-rhubarb pie but don’t eat rhubarb in any other form.

This is a tragic response. Rhubarb is a complex food. It is adaptable to many uses, both sweet and savory. To see it only as a complement to strawberries—much as I love strawberries—doesn’t do it justice.

This year for Strawberry-Rhubarb Pie Day, I’m actually preparing a relative of a pie rather than an actual pie: a strawberry-rhubarb cobbler. According to culinary librarian Lynne Oliver, who created the helpful source “The Food Timeline,” cobblers were an American invention.

“According to food historians, cobbler … originated in the American West during the second half of the 19th century,” she writes. “Necessity required westward-bound pioneer cooks to adapt traditional oven-baked pie recipes to quick biscuit treats that could be cooked in Dutch ovens.”

I love the flexibility of a cobbler. It’s easy to make (no rolling required!), and it doesn’t have to look perfect. Indeed, the rough look of the dish is part of its charm. The named “cobbler” is purported to have come from this dessert’s resemblance to cobbled streets.

A cobbler also takes less time in the oven than a pie, a welcome characteristic on a warm day.

Perhaps we can re-name June 9 Strawberry-Rhubarb Cobbler Day. Or perhaps this cobbler should be rewarded with a day of its own a little later in June. It’s quite delicious.

Before I leave you, I wanted to give you the details about the concert I mention on the video. Here’s a nice listing about it.
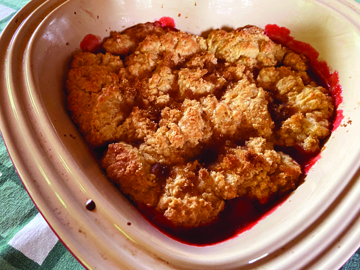
Strawberry-Rhubarb Cobbler

Ingredients:

for the rhubarb base:
1 cup sugar
3 tablespoons cornstarch
3 cups chopped rhubarb
2 cups chopped strawberries
2 tablespoons lemon juice
1 tablespoon butter, diced

for the cobbler crust:
1 cup flour
2 tablespoons sugar
1-1/2 teaspoons baking powder
1/4 teaspoon salt
1/4 cup (1/2 stick) butter
1/4 cup milk
1 egg
1 teaspoon vanilla

for the topping:
2 tablespoons brown sugar

Instructions:

Combine the sugar and the cornstarch for the base in a medium nonreactive (non-aluminum) pot. Stir in the rhubarb, the strawberries, and the lemon juice. Cover this mixture and let it sit for an hour or two to help the fruit juice up.

Preheat the oven to 400 degrees. Butter a 1-1/2-quart casserole dish.
Uncover the rhubarb mixture and bring it to a full boil, stirring frequently. Boil, stirring gently, for 1 minute. Remove the fruit from the heat.

(If you want to make the fruit mixture ahead of time, you may; just let it cool to room temperature and then refrigerate it until you are ready to preheat your oven and make your cobbler.)

Spread the strawberry-rhubarb mixture in the prepared pan. Dot the top with butter.

To make the crust, whisk together the flour, the sugar, the baking powder, and the salt. Cut in the butter, but don’t overdo it. You should still see tiny pieces of butter in the mixture.

Whisk together the milk, the egg, and the vanilla. Add them to the dry ingredients, and mix just until moist. Drop this mixture onto the strawberry-rhubarb combination, and spread it around to cover the fruit. Sprinkle clumps of brown sugar over all.

Bake until lightly browned, 20 to 25 minutes. Serve by itself or with whipped cream or ice cream. (Leftovers are great for breakfast.) Serves 6 to 8.

Watch me make it!

Celebrating the End of Summer with Corn

Thursday, September 9th, 2021

We are still eating corn in western Massachusetts. Corn is the perfect late-summer vegetable. Its color reflects the hues of the sun and the goldenrod-filled fields. Its subtly sweet taste reminds us to savor summer’s beauty while we still have it.

Along with most Americans, I believe that fresh corn is best enjoyed boiled or steamed briefly and then slathered with butter, salt, and pepper. In recent years, I have learned to skip the butter, but I keep it on the table for corn-consuming guests.

Unfortunately, I am seldom able to restrain myself from buying more ears of corn than I need at local farm stands. This can be a problem. As readers probably know, corn is ideally cooked and consumed the day on which it is picked.

What’s a cook to do? I tend to cook corn briefly as soon as possible and then save some of the cooked corn in the refrigerator or freezer for future use. I can make corn fritters, corn salad (it goes with lots of other vegetables), corn chowder, and so forth.

I recently used leftover corn in a risotto. I share that recipe below. Risotto can sometimes seem daunting because it requires the cook to pay attention throughout the cooking process.

I handle the challenge of risotto in a couple of ways. First, I invite my guests to come into the kitchen with me to sip cocktails or whatever beverage they choose. That way, I don’t miss out on any scintillating conversation while I stir my risotto.

Second, I remind myself to let the risotto talk to me. The process of making it entails adding liquid a little at a time as needed. If I monitor the bottom of the pan for dryness as I chat with my friends and relatives, this is fairly easy.

The risotto tells me when it is done by creaming. This is a magical process. The cook has to taste the rice grains frequently. Suddenly, the risotto will reach a point at which it still has a little chew but also tastes rich and creamy. I promise, if you keep tasting (the proverbial tough job that somebody has to do!), you’ll know this point when you get there.


Sweet Corn Risotto

Ingredients:

2 tablespoons plus 1/4 cup (1/2 stick) sweet butter
2 tablespoons extra-virgin olive oil
2/3 cup chopped onion
1-1/4 cups Arborio rice
3/4 cup white wine (approximately)
1/2 bell pepper, chopped
2 cups lightly cooked corn kernels
1 tablespoon chopped parsley (plus a little more if you like)
4 cups simmering chicken or vegetable stock (or as needed; you may use water if you run out of stock)
2 tablespoons diced fresh tomatoes
1/2 cup grated parmesan cheese (plus a bit more if desired)
a little more chopped parsley or tiny basil leaves for garnish

Instructions:

Melt the 2 tablespoons of butter and the oil. Stir in the onion. Cook, stirring, for 5 minutes. Add the rice. Cook for 1 minute, stirring. Add 1/2 cup of the wine plus the chopped bell pepper and a little of the corn, and stir. Add 1 cup of stock and keep stirring.

As the mixture cooks and dries up, add the remaining stock a bit at a time. Stir frequently but not constantly. Cooking will take quite a while—somewhere between half an hour and 45 minutes. The corn is done with it suddenly tastes creamy.

Just before serving, add the tomatoes; the parsley; the remaining wine, corn, and butter; and the cheese. Serves 6.

Here’s my video for this recipe:

Tinky Makes Corn Risotto

https://youtu.be/-518nFR08j8


Lovely Pink Blossoms

Tuesday, June 29th, 2021

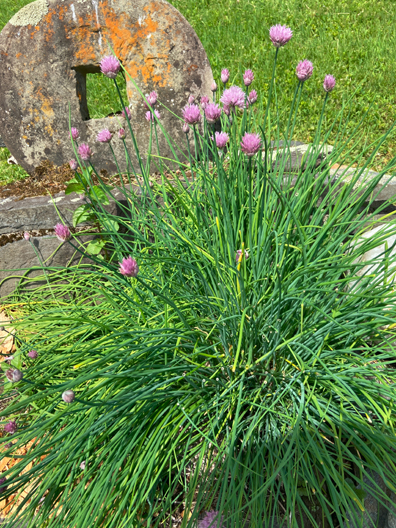
My chive blossoms are winding down, but I still have some. Chives are the first herbs to come up in my garden, and when their pink flowers join the green stalks I’m in springtime heaven.

Each year I make chive-blossom vinegar. It’s the prettiest vinegar I know. I often give it to friends … who then want to know what to do with it. The recipe below is for them. I also put it in any salad that can use a little onion flavor; yesterday, it gave zip to my chicken salad.

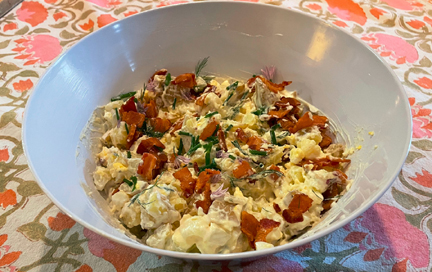
This potato salad would be great for July 4. Happy summer!

Chive Blossom Vinegar

Ingredients:

enough chive blossoms to fill at least half of a clean 1-cup jar
just under 1/2 cup distilled white vinegar

Instructions:

Place the chive blossoms in the jar. Heat the vinegar until it smells strong and just starts to bubble around the edges. Pour it over the blossoms, and cover loosely. Later in the day, tighten the cover. Keep the jar in a cool, dark place for 2 days, turning it a couple of times a day; then strain the vinegar into a clean jar through cheesecloth. Makes just under 1 cup of vinegar.

Chivy Potato Salad

Ingredients:

4 to 5 medium potatoes, cleaned but not necessarily peeled and then diced
the juice of 1/2 lemon
1/4 cup canola or olive oil
salt and pepper to taste (go lightly with the salt!)
2 celery stalks, chopped
2 hard-boiled eggs, chopped
1 cup mayonnaise (plus more if needed)
2 generous tablespoons chive blossom vinegar
1/2 teaspoon Dijon mustard
chopped chives to taste
chopped dill to taste
crumbled bacon for garnish (optional)

Instructions:

Boil the potato pieces until they are just tender. Drain them, and toss them with the lemon juice, oil, and some salt. Let the mixture cool. Add the celery, egg, and herbs. Blend the mayonnaise the vinegar, the pepper, and the mustard. Toss this mixture onto the salad. If you need to, add a little more mayonnaise. Taste and adjust the flavors. Top with a few more chopped chives and crumbled bacon (if desired). Serves 6.

Watch me make it here:

Tinky Makes Chive Blossom Vinegar and Potato Salad

Springtime Carrot Cake

Friday, May 21st, 2021

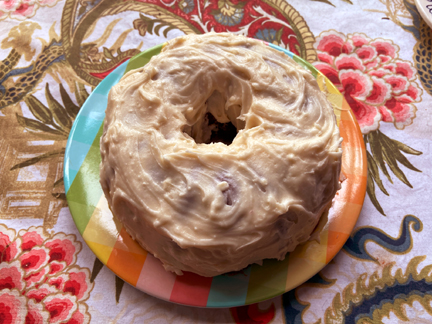
Here’s a carrot recipe before I move on to asparagus and rhubarb. I love fruit- and vegetable-based cakes. They are moist and flavorful, and one can delude oneself that one is getting nutrition. (One is, of course, but one is also getting fat, flour, and sugar. Sigh.)

I confess that I have posted a version this recipe before. The previous recipe was slightly different, however, and it made a big cake. I don’t always want a big cake. If you don’t have a six-cup bundt pan, you may use an 8-by-8-inch square pan; just check the oven a little sooner. But I highly recommend getting the smaller bundt pan. I use mine all the time when I’m serving a small family or crowd.

Thanks to my cousin Deb Smith for the original recipe!

The Cake

Ingredients:

1/4 cup (1/2 stick) sweet butter at room temperature
1/4 cup canola oil
1 cup sugar
2 eggs
1/4 teaspoon salt
1 teaspoon cinnamon
1 teaspoon baking soda
1 cup flour
1-1/2 cups grated carrots (about 1/2 pound)

Instructions:

Preheat the oven to 350 degrees. Grease and flour a 6-cup Bundt pan. Combine the butter, the oil, and the sugar; then add the eggs, followed by the salt, the cinnamon, and the baking soda. Stir in the flour, followed by the carrots.

Pour the batter into the prepared pan, and bake until a toothpick inserted into the center of the cake comes out clean, about 30 to 35 minutes. Cool the cake for 20 minutes; then remove it from the pan and cool it completely before icing it with cream-cheese frosting. Serves 8.

And now the video to go with the cake!

Tinky Makes Carrot Cake

Year of the Ox (or anytime) Dumplings

Thursday, February 11th, 2021

February may be the shortest month of the year, but it’s long on holidays. When I was in second grade our class performed a short play in which each of us got to talk about one of this month’s special days.

In the next week alone several holidays are coming up: the Chinese New Year, Valentine’s Day, Presidents’ Day, and Mardi Gras/Shrove Tuesday. I don’t have room to celebrate them all in this column so I am focusing on the first. I encourage you to do something for every single one, however.

Tomorrow, February 12 (also Lincoln’s birthday!), marks the start of this year’s Chinese New Year. I love lunar holidays. To those of us who measure out our lives according to the Gregorian calendar, holidays that don’t fall on the same date every year offer a welcome unpredictability.

This lunar new year comes on the second new moon after the winter solstice so it can fall anywhere from late January to late February. This year it’s right in between.

As many readers know, there are 12 signs of the Chinese Zodiac. Each is assigned an animal, and the animals repeat in a cycle of 12 years, roughly corresponding to the time it takes Jupiter to orbit the sun. This year will be the year of the ox.

People born in this year (or born 12, 24, 48, or 60 and so on years ago!) will exhibit ox-like characteristics. They will tend to be hard working, dependable, and generally solid.

The Chinese New Year is a time when Chinese families get together. During these reunions family members begin the new year’s celebration, which lasts for more than two weeks, by preparing food together. A special favorite, especially in the north of China, is dumplings.

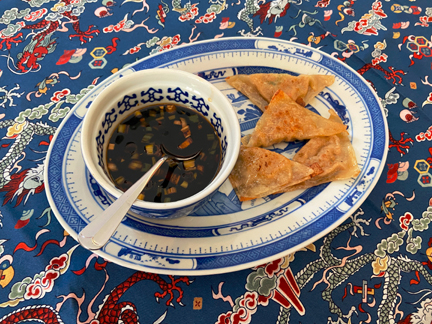
My dumpling recipe isn’t necessarily authentically Chinese, but it has plenty of Chinese flavor and flavors. I have to admit that I cheated a little; I purchased my dumpling wrappers.

To me dumpling wrappers are like tortillas, something one makes best if one makes them all the time. I have never made them. I hadn’t even made dumplings themselves before starting to work on this article.

I actually strayed further by using store-bought wonton wrappers rather than dumpling wrappers. The wonton wrappers, which like most of the ingredients in the dumplings are available in most supermarkets, are slightly thicker than dumpling wrappers and therefore a little easier to work with.

I hope making and eating the dumplings will give you warm feelings of family and hope for the months to come. Happy Chinese New Year! Here’s to finding something to celebrate every day of the month and every day of the year.

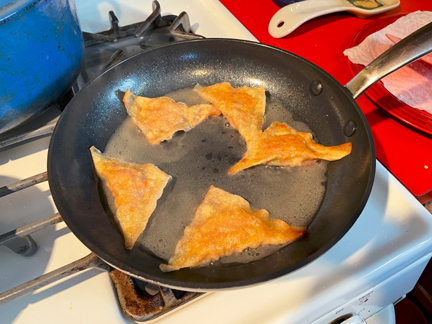
They’re almost ready!

Year of the Ox Dumplings

Ingredients:

for the filling:
1/2 pound ground pork (or ground chicken if you don’t eat pork)
1 egg, beaten
1/2 cup finely chopped cabbage (preferably Chinese cabbage, but any cabbage will do in a pinch)
2 scallions (white part only), chopped
1 tablespoon grated carrot
1 clove garlic, minced
1 small finger ginger, minced
1 teaspoon toasted sesame oil
1 pinch sugar
1 teaspoon soy sauce
1/2 teaspoon cornstarch

for the dipping sauce:
3 tablespoons soy or tamari
2 tablespoons rice vinegar
1 teaspoon sesame oil or toasted sesame oil
1 teaspoon chili oil
1 clove garlic, minced
1/4 teaspoon minced ginger
1 scallion, chopped (white plus some green)

for assembly:
24 wonton or dumpling wrappers (possibly even more, depending on how big they are)
1 egg
1 tablespoon water
canola or peanut oil as needed for frying

Instructions:

Combine the ingredients for the filling. Refrigerate them while you assemble the other ingredients.

Combine the ingredients for the dipping sauce in a bowl. Set them aside.

For each dumpling, spoon about 1 teaspoon of the filling into the center of a wrapper. Do not overfill your dumplings! Combine the egg and the water.

Use your finger to coat the edges of the wrapper with a bit of the egg mixture. Fold the wrapper in half to cover the filling, and seal carefully with more egg mixture. Put the filled dumplings on a plate or board, and cover them with a damp paper towel.

Pour enough oil into a nonstick skillet to cover the bottom, but barely. Heat the oil over medium heat until it shimmers. Add enough dumplings to make 1 layer. (The dumplings should not touch each other in the pan.)

Cook the dumplings until their bottoms begin to brown and then flip them over and brown them lightly on the other side. Reduce the heat to low, add a splash of water (about 1/4 to 1/3 cup). Watch out for sizzling and splattering when the water hits the oil.

Cover the dumplings. Cook for 2-1/2 minutes. Uncover the dumplings and cook them until the liquid has almost disappeared and the bottoms are crispy. Remove them to a serving platter. Repeat with the remaining dumplings. Serve with the dipping sauce.

Makes a lot of dumplings.

I made a video of these to send to Mass Appeal so you can see my technique. (I use the word loosely! I used too much oil in the pan.) I also made my beloved key-lime pie as a Valentine treat on Mass Appeal. Here are those videos:

Tinky Makes Dumplings on Mass Appeal

Tinky Makes Key-Lime Pie for Valentine’s Day