I Brake for Peanut Butter Burgers!

July 30th, 2026

Courtesy of “Our Good Life”

I have been a food writer now for decades, and I still manage to miss food trends. I would have missed the one about which I’m writing today if the Tinkymobile hadn’t decided that it needed professional help a while back.

I was happily driving home from a singing rehearsal when I noticed that the little blue Honda was starting to make a strange sound when I stepped on the brakes. It was sort of a hum, sort of a moan, and sort of a whirr.

I did my best to avoid braking—not an easy task in Western Massachusetts hilltowns—and called the nice folks at the Honda dealership in Greenfield as soon as I got home.

I relayed the sound over the phone to the best of my ability, and I was informed that I had performed an excellent imitation of a car that needed new brake pads.

This information was flattering in one sense. I pride myself on my excellent ear. It was but dismaying in another sense. I was sure the pads wouldn’t be cheap.

They weren’t, but a person and her car definitely need functioning brakes so I took the first service appointment I could get. I brought along my laptop so I could do some work while the Tinkymobile was undergoing surgery.

I did work, but I also talked to other customers, as well as to my service adviser, Kelsie, who informed me she is pregnant. (Congratulations, Kelsie!) I also glanced from time to time at the television set in the waiting area, which is always tuned to some kind of home-and-garden network.

I was struck by a very odd-looking hamburger being dished up onscreen. It appeared to be topped with a gooey, light-brown substance. Not quite sure what I was looking at, I closed the laptop and watched for a couple of minutes.

The burger turned out to be a Peanut-Butter Burger (PBB), which is exactly what it sounds like: ground beef topped with a big gob of peanut butter. The heat of the burger melts the peanut butter, creating a savory spread.

As soon as I got home and started talking to other people about the experience, I discovered that PBBs are everywhere. My friend Vicky’s son, who orders burgers every time he dines out, had recently eaten one at a restaurant.

The Blue Rock in Shelburne Falls serves a PB and Jam Burger, which features homemade ground peanut butter, smoked Gouda, onion jam, bacon, and lettuce, or so my neighbor Ruth informed me. (I really have to try this soon!)

A quick internet search revealed that two different eateries take credit for inventing the PBB. The now-defunct Wheel-Inn, a drive-in restaurant in Sedalia, Mo., began to serve something called the Guber Burger (a.k.a. Goober Burger, adapted from a nickname for the peanut) in the 1940s.

The original Guber Burger added lettuce, tomato, and mayonnaise to its burger and peanut butter.

George Motz, a chef, writer, and filmmaker who calls himself the Burger Scholar, recreates the original Guber Burger but eschews the veggies and mayo and pops on some pickle slices. He also warms the peanut butter to make it spread even more. Motz dubs the PBB “an amazing burger profile.”

Here is Motz making this (and other) burgers:

Bearden’s, a restaurant in Rocky River, Ohio, has been serving Peanut-Butter Burgers to fans at its lunch counter since the 1930s or ‘40s. (The exact date is vague.) Its entry into the PBB menu is also sometimes known as the Peanut Butter Bear. Like Motz, Bearden’s likes to add a few pickles to the mix.

All of the combinations about which I learned appealed to me, particularly when they threw in a little bacon to enhance the peanut butter and add even more sodium. I wanted to create my own PBB, however.

I pondered for a while and searched my memory for beloved peanut-butter foods. My fancy landed on one of my favorite Asian dishes, Indonesian sate (also spelled “satay”). Decades ago, our late neighborhood matriarch, Mary Parker, visited Java and brought back a recipe for this treat.

Sate is marinated meat or chicken cooked on a skewer and served with a peanut-dipping sauce. I determined that my Peanut Butter Burger would use the sate sauce for extra depth of flavor. It adds onion, ginger, soy sauce, and a hint of hot pepper to its peanut butter.

My PBB was absolutely delicious. After I made it, I discovered that the idea, like most recipes, was not original. Chef Jamie Oliver has a Satay Burger on his website. So do others. Happily, no one else has come up with my exact recipe … and I think I can still get points for creativity here. Not to mention flavor.

By the way, I know we food writers always remind readers to read through a recipe before beginning to make it so that they make sure to understand all the steps and shop for all the ingredients.

I FORGOT TO DO THAT! Alas, I just threw the chopped onion for the sauce into a saucepan with the other ingredients instead of sautéing it in oil first. I’m sure it would have tasted even better if I had followed the directions. It was pretty tasty without following them, however.

Feel free to halve this recipe if you’re not serving a crowd.
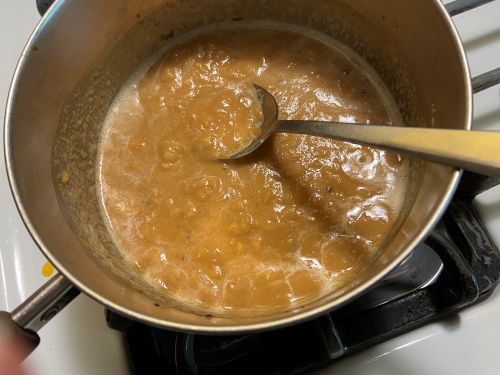
Stirring the Sauce

The Sate Peanut-Butter Burger

Ingredients:

for the sauce:
1 onion, coarsely cut
2 tablespoons neutral oil (peanut, sunflower, or Canola)
1 cup peanut butter
1 cup water
1 tablespoon soy sauce
1 teaspoon sugar or maple syrup (I used the latter for a New England twist)
1 tablespoon lemon juice
1 small wedge fresh ginger, finely chopped
1 to 4 teaspoons crushed red pepper (I usually end up with about 2 teaspoons)

for the burgers (per person):
1 hamburger patty of your choice (if you’re vegan, feel free to use an ersatz burger)
1 toasted hamburger bun
peanut sauce to taste (Be generous!)

Instructions:

Begin by making the sauce, which can be prepared a day or two in advance.

Sauté the onion in the oil until lightly brown. Pop it into a saucepan. Add the other ingredients. Experiment with the pepper. This sauce should be HOT to the taste.

Cook until the flavors blend, probably about 5 to 10 minutes, stirring frequently. If the sauce becomes too thick, add more water. It should be the consistency of thick cream sauce.

If you are not using the sauce right away, let it cool to room temperature and then store it, covered, in the refrigerator. When you are ready to make your sate burger, bring it to room temperature. If you feel like being a Burger Scholar (I did!), you may even add a little water and heat it slightly before applying it to a burger.

Cook your burger to your favorite level of doneness. (I tend to err on the rare side, although that is frowned up by health experts.) When the burger is almost ready, toast your bun.

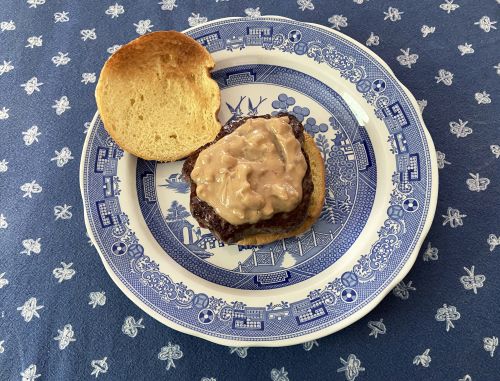
Pop the burger onto the bottom of the bun, add a goodly glob of sauce, and cover. Enjoy! Serves 1 with LOTS of leftover peanut sauce.
Memories of Mousse

February 9th, 2026

Left to right: Dagny’s secretary Agnes, Dagny, Tinky, and Eric in Paris

With Valentine’s Day on the horizon, I am thinking of chocolate .. and specifically  of my mother’s recipe for Chocolate Mousse.

“Mousse” means “frothy” or “foamy,” apt words for this airy dessert. Many sources credit the artist Henri de Toulouse-Lautrec with inventing it. Alas, according to “Food Republic,” recipes for Chocolate Mousse were published long before he whipped it up for his Bohemian friends in Paris. Still, he did make it.

My own association with Chocolate Mousse relates to another artist who lived in France, the Dutch painter Vincent Van Gogh (1853-1890).

I have consumed (and even prepared) many amazing meals over the years. Among the most memorable of these was a luncheon in Auvers-sur-Oise in France when I was 19.

Auvers is about an hour outside of Paris, the city in which I was helping my godmother Dagny, her nephew Eric, and a host of colorful characters mount a summer film festival. Dagny, who was a paraplegic, lived in Florida but spent several months each year in Paris. She wanted to make sure she could get wherever she needed to go; the metro was far from accessible to someone on crutches. She consequently shipped her red Ford to France each time she visited.

One day she decided to drive Eric and me to Auvers. Our destination was the Auberge Ravoux, the inn in which Van Gogh spent the last two months of his life. When we visited it was known as la Maison de van Gogh (the House of van Gogh).

© Institut Van Gogh and Erik Hesmerg

The dining room was small but inviting. We sat at a corner table and ordered. My main course was Steak au Poivre (Pepper Steak). This is a classic French dish: a small steak, crusted in freshly cracked peppercorns and pan fried.

The same pan is used to make the sauce. This consists of stock, brandy or cognac (which the French warm and then light dramatically), and cream. Heaven on a plate.

The restaurant served it with Pomme Frites (French Fries), which I can usually do without. These crispy pieces of potato I adored. I then had a salad glistening with a simple vinaigrette of oil, red wine vinegar, and mustard. I can almost taste this perfect combination of foods in my mouth today.

When the waiter asked about dessert, I intended to say “non” … until I saw it. He returned to the table with a large bowl—the word “vat” comes to mind—of fluffy, chocolaty Mousse. It melted on the tongue.

After lunch, Eric and I climbed the shabby, curved wooden stairs at the Maison to see the room in which van Gogh spent the weeks before he killed himself. The room was unfurnished, illuminated by a skylight.

The publicists at the Auberge write on its website that the room has “rien à voir… mais tout à ressentir” (“nothing to see … but everything to feel”). Legend has it that the owners of the Auberge never rented it out again after the artist’s death, reluctant to have others stay in “la chambre de suicide” (the suicide room).

© Institut Van Gogh by Erik and Petra Hesmerg

In fact, Van Gogh didn’t shoot himself in the room. He pulled the trigger outdoors and made his way back to the auberge. Still, he died in his bedroom a day and a half later so I guess one could call it “la chambre de suicide.”

The room was tiny, a little more than 75 square feet in area. Apparently, van Gogh used another room at the inn to paint.

Paint he did. He averaged more than a painting a day during his time in Auvers.

Despite his productivity there, he continued to be plagued by the physical and mental ill health that had followed him for much of his life.

I often wonder why many people who are intensely artistic—painters, musicians, actors, even some writers—are mentally ill and/or engage in self-destructive behavior.

Does their artistic talent stem from their off-kilter way of seeing and feeling the world? Or does their genius render them incapable of moderation and common sense?

I will never know. Although I have some creative gifts, I am no genius. I can be sadly pedestrian.

Vincent van Gogh painted full time for only about a decade. As a young man he dabbled in a variety of professions until his younger brother Theo convinced him that he should devote his life to art … and provided the funds to keep Vincent housed and fed while he painted.

Despite the relative brevity of his artistic career, van Gogh produced an astounding body of work, one with which even most non-art students are familiar.

According to the Van Gogh Museum in Amsterdam, his last painting was a vivid, gnarly study called “Tree Roots.” In “Smithsonian,” Meilan Sooley writes, “In some ways, the painting appears to function as a goodbye.”

Tree Roots, 1890

Sooley quotes art historian Louis van Tilborgh as suggesting that “it’s van Gogh’s way of saying: ‘I have lived, just like those tree roots. I’ve done my best, I’ve struggled with life, I’ve grown, had setbacks and now is the time it ends. I am falling.’”

Van Gogh’s brother Theo arrived before the artist died and recorded Vincent’s last words: “La tristesse durera toujours.” (“The sadness will last forever.”)

For me, the flavor of Chocolate Mousse will last forever. (I told you I was pedestrian!)

Mousse at the Auberge © Institut Van Gogh/Erik Hesmerg

Mousse au Chocolat

Ingredients:

6 ounces good-quality semisweet chocolate
4 tablespoons (1/2 stick) sweet butter
2 teaspoons vanilla
5 tablespoons coffee, divided (you may use water instead or use a bit of each)
4 eggs at room temperature, separated
1/2 cup superfine sugar, divided
1 pinch salt

Instructions:

In the top of a double boiler (or in a heatproof bowl over warm water) combine the chocolate, the butter, the vanilla, and 2 tablespoons of coffee. Cook the mixture over hot water, stirring, until the chocolate melts. Remove the pan from the top of the hot water, and set it aside to cool.

In another heatproof bowl combine the egg yolks, 3 tablespoons of coffee, and 1/4 cup of the sugar. Place them over the hot water and cook, whisking vigorously, until the mixture becomes uniformly frothy and lighter in color.

Remove the yolk mixture from the top of the hot water, and whisk it for another minute or so. Whisk in the chocolate mixture. Allow the resulting concoction to cool for a few minutes so that it is lukewarm to the touch. (You may begin beating the egg whites while the chocolate/yolk mixture is cooling.)

Combine the egg whites and salt in the bowl of an electric mixer. Beat them until the egg whites are foamy. Sprinkle on the remaining sugar and beat the egg whites and sugar until stiff peaks form. Gently fold the whites into the chocolate mixture. (It helps to add a little bit of the whites at first, followed by the rest.)

Spoon the mousse into a serving bowl or bowls. Cover and refrigerate for several hours or overnight; then serve with a little whipped cream. Serves 8.

Soup Month: French Onion Soup

January 26th, 2026

January is National Soup Month. This January has been a doozy weatherwise, and I have indulged in a lot of warm soup.

One of my favorite soups at this time of year (or any time of year, really, but it is hardy so January is ideal for it) is my mother’s French Onion Soup. She of course preferred to call it “Soupe a l’Oignon,” Francophile that she was.

I’m not precisely sure when Taffy, as I called her, learned to make this soup. She had two French cooking teachers. The first was Madame Continénie, her landlady in Paris during her Junior Year Abroad in Paris in the late 1930s.

Madame taught my mother how to make many basic dishes. She also tried to make her teenage guest more sophisticated. The first endeavor was more successful than the second. My mother had many wonderful qualities, but sophistication was not one of them. Luckily, she didn’t need to be sophisticated or soignée. She was direct, fun, and smart. Those qualities stood her in good stead throughout her life.

Taffy went on to study French cooking at a Cordon Bleu school in New York in the late 1950s or early 1960s. Her teacher there, Madame Béran, taught her a lot about cooking and also about French.

In Taffy’s little handwritten cookbook, she sometimes inscribed recipes in French even when she had clearly learned them from Americans. She adored the French language.

Whoever taught her to make it, this soup was a staple of my youth. It uses one of my favorite techniques, caramelizing onions. Gently frying onions for a long time always makes the house smell homey and delicious.

Taffy’s recipe gets additional robust flavor by using beef broth and red wine instead of the chicken broth and white wine that are more usual in this country.

Please do not misunderstand me. I will happily slurp down onion soup however it is made. I do think that the darker, more flavorful broth and wine make it even tastier, however.

Whenever my mother went to Paris, she made a point of visiting Les Halles, the popular open-air market that was founded in the 12th century. The market was known for its Soupe a l’Oignon. One could find this soup there at any hour of the day or night, and it was always freshly made and fabulous.

Les Halles around the Turn of the Last Century’ (Library of Congress)

My parents took me to Les Halles first when I was seven and had never tasted onion soup. Like my mother, I fell instantly in love with the soup and with the bustling market in which it was served … although I was small enough to need help getting up onto a chair there to eat.

Taffy was saddened when the market was torn down in 1973 to make room for an underground shopping center that had none of the original’s character and charm. The area is now a mall. Luckily, Taffy, who emphatically did not believe that her beloved Paris needed a mall, never learned of that final transformation.

The old Les Halles market lived on in her kitchen and continues to do so in mine … in January or in any other month. As Marcel Proust noted when he wrote of madeleines, flavor is an ideal vehicle for transporting us into the past.

This particular flavor made me VERY happy earlier this month when the weather was disgusting.

If you’re in a hurry or don’t have oven-proof bowls or crocks, don’t worry about putting the cheese on toasted bread and broiling it. Just serve the soup with grated cheese on top and toasted bread on the side.

Serving the soup with the broiled bread and cheese (“gratinée”) is more authentically Parisian, however. And quite delicious.

I probably have no need to tell you that my mother had oven-proof crocks, which she bequeathed to me. In fact, she had, and I have, TWO sets of crocks. The one I prefer has little baskets to hold the hot soup when it comes out of the oven.

Taffy’s French Onion Soup

Ingredients:

for the soup:
4 tablespoons (1/2 stick) sweet butter
2 tablespoons extra-virgin olive oil
6 medium onions, finely sliced
1 teaspoon Dijon mustard
salt and pepper to taste (Start with 1/2 teaspoon salt and 8 turns of your pepper grinder.)
1 generous teaspoon flour
4-1/2 cups beef broth
1/2 cup red wine (a little more is fine!)

for the topping:
sliced baguette (enough to cover the soup in the 4 crocks; it doesn’t hurt to have extra, however; the toasted slices make great crackers for dip or cheese)
a drizzle or two of extra-virgin olive oil
grated or sliced Gruyère or other Swiss-type cheese as needed (Last week I ended up using “Swiss” slices from the grocery store, which were inelegant but sufficient; I used 2 slices per crock.)

Instructions:

Melt the butter in a Dutch oven. (I used my 5-1/2-quart pot. The freshly sliced onions take up a fair amount of room, although they do shrink as they cook.)

Add the oil and the onions. Cook fiercely over medium-high heat for a few minutes; then turn down the heat and continue cooking, stirring every 5 to 10 minutes, until the onions begin to turn golden. This will take from 1/2 hour to 1 hour. While the onions are caramelizing toast the bread. (See below.)

Stir in the mustard, the salt, the pepper, and the flour. Stir for 1 minute or until the mixture is smooth. Slowly add the broth and the wine.

Bring the soup to a boil, turn it down, cover it, and simmer it for 15 to 20 minutes. After the 15 minutes, taste it and see whether it needs a little more salt. (You shouldn’t need a lot; the cheese is salty!)

You will know that the soup is ready when it tastes warm and flavorful. The taste of the wine should be perceivable but not strong.

To toast the bread slices, preheat the oven to 350 degrees. Lightly rub the pieces of baguette on both sides with a little olive oil, or spray them with an olive-oil spray. This is a balancing act. The oil helps the bread toast and adds flavor. You don’t want the pieces of bread to taste oily, however.

Place the bread pieces on a rimmed cookie sheet and bake them for 20 minutes, turning once. Set them aside to wait for the soup.

When the soup is almost ready, preheat the broiler. Ladle the soup into 4 ovenproof crocks, place toasted bread on top of each crock (you will need 1 to 3 slices, depending on the size of your baguette), and cover with cheese.

Broil the soup on high until the cheese melts and turns golden brown. Serve within a few minutes, but warn your fellow sippers to be careful. Onion soup can get very hot and burn the tongue. Serves 4.

Taffy with a Friend

Comfort Food at Its Best

December 30th, 2025

I love New Year’s celebrations—lunar, Jewish, Christian, whatever. In a sense, of course, the divisions cultures establish between years are arbitrary. Still, they give us a chance to look back on where we have been and make wishes for the future. A wish is always a pleasure to make, even if it doesn’t come true … or doesn’t come true in quite the way we envisioned it would.

On New Year’s Eve, I like to entertain friends with warm, comforting dishes that offer a contrast to the chilly weather. One of my favorite New Year’s Eve dishes is my friend Cherie’s “Mom’s Meat Lasagna,” which I made for this holiday about 10 years ago. It was delicious. But it involved A LOT of steps. Sometimes I’m in the mood for something much simpler.

Luckily, I have in my repertoire something that replicates the flavors of lasagna but takes a lot less work … particularly if one cheats (as I usually do) by using jarred marinara sauce instead of the homemade version: Baked Ziti.

When I say “Baked Ziti,” I really mean “Baked Tubular Pasta.” I often make it with rigatoni or penne. Even when I stray from actual ziti, I like to call the dish Baked Ziti. That name reflects the celebratory nature of the origins of this dish in Sicily. In that island’s language, “zita” means bride, and “zitu” means groom. Put together, they become “ziti,” the wedding couple. In fact, the ancestor of this dish was served at Sicilian and Southern Italian weddings for centuries.

Sicilian-American food expert Peter Giuliano writes:

I remember reading about ‘lasagna’ in Garfield comics as a kid and not knowing what it was. That’s because we didn’t really eat it [in] my Sicilian-American family—we much preferred the dish we called ‘baked pasta’ or pasta al forno, a dish of tubular pasta like ziti or rigatoni baked with meaty tomato sauce, ricotta, and other cheeses.

We made it at home, of course, but it was really a dish for weddings: basically 100% of the wedding receptions I attended as a kid featured huge pans of baked pasta and trays of charcuterie, which we called “cold cuts.”

I gather that the Pasta al Forno served at Sicilian weddings for centuries was a bit different from what we Americans make. Our dish is a lot more goopy and cheesy … probably because many Americans are a lot more goopy and cheesy than traditional Italians and Sicilians. Nevertheless, it is at heart a classic Southern-Italian-American dish and would have reminded Giuliano’s forebears of their homeland.

I love tubular pasta because it has so much surface to catch the sauce and other yummy ingredients in this dish. And I love Baked Ziti because it’s a snap to mix the pasta with the other ingredients to construct it, in contrast to the careful layering for which lasagna calls. (Okay, technically, there ARE layers in Baked Ziti—but they are easy-peasy layers as you will see in the recipe below.)

I learned from Giuliano another reason to love tubular pasta. The first time I tried making pasta, I didn’t roll the dough out thinly enough. The substance that resulted was a gummy mess. The outside cooked just fine, but the inside was decidedly underdone. When Italian grandmothers (and other relatives) learned to create tubular pasta, Giuliano explains, they avoided my mistake and produced a hollow shape that could cook uniformly.

I encourage you to try this recipe for New Year’s Eve or any other occasion. I wish I could tell you where I got it. I have been making it for years and can’t really remember when and how I started. I may just have tasted a friend’s version and reconstructed it as well as I could. In any case, it’s simple and celebratory.

You may assemble it a little before baking it for guests. This frees you up to chat with your company … and to ponder those all-important New Year’s wishes.

If you do not plan to serve vegetarians, I highly recommend including the optional sausage, which adds a lot of culinary personality to the dish. This version of the dish is a bit wet—but I like wet! Nothing is worse than dried out pasta.

And if you feel that you absolutely have to add a little extra mozzarella, you have my blessing.

Happy (almost) New Year from my kitchen to yours.

Baked Ziti

Ingredients:

1/2 pound ziti or another tubular pasta
1/2 pound sweet or hot Italian sausage—or a mixture of the two, preferably not in casing (if it’s in casing, do your best to get it out), optional
1 cup ricotta cheese (the best brand you can find)
1 cup shredded or cut up mozzarella cheese (again, the best you can manage), divided
1/2 cup Parmesan or Romano cheese, divided
1 tablespoon minced fresh parsley (use 1 teaspoon dried if you absolutely must)
1/4 teaspoon salt
1 egg
1 24-ounce jar prepared Marinara sauce or 3 cups homemade tomato sauce

Instructions:

Preheat the oven to 350 degrees. Cook the pasta al dente according to the manufacturer’s directions. Drain it and pour cold water over it to keep it from cooking any longer. Place it in a bowl.

If you are using the sausage, pan fry it in small pieces while the pasta boils and drain it on paper towels.

In a bowl combine the ricotta, half of the mozzarella, half of the Parmesan, the parsley, the salt, and the egg. Set aside.

Spread a small amount of the tomato sauce on the bottom of a 1-1/2-quart casserole dish. Ladle a bit more of the sauce into the pasta, and blend.

Layer half of the pasta mixture into the casserole dish, followed by half of the ricotta. Note that the ricotta will be applied in dabs; you can’t really spread it.

Place the sausage in the next layer; then make another layer each with the remaining pasta and ricotta. Pour the remaining sauce over the top, followed by the reserved cheeses.

Bake until the dish is heated through and the cheese on top has melted, about 20 to 30 minutes. Serves 4 generously.

Butternut Squash Risotto

November 26th, 2025

This sign was donated by Dorothy Leggett to the local historical society. Courtesy of Wicked Local.

Readers, you probably have your Thanksgiving menu all figured out. This isn’t a Thanksgiving dish anyway. It takes too much time at the stove! But as the temperatures get colder it’s lovely to have a reason to linger there. So make it next week … or the week after.

Butternut squash is everywhere at this time of year. Although many of us think of pumpkin orange as the quintessential color of fall, to me the perfect autumn shade is the more subtle hue of butternut squash. From time to time, I see a house painted in this color. I envy its residents.

A butternut squash can last a single person like me a long time. I tend to vary what I do with it. Sometimes I fry tiny pieces with onions in a sort of hash. Sometimes I roast half of a squash in the oven, scoop out the flesh, and mash.

And then there’s this risotto, best served to guests since it’s hard to make just a little.

I only recently learned that butternut squash, a staple of fall here in New England, was first eaten less than a century ago.

Although Indigenous peoples have eaten various forms of squash on this continent for more than 6000 years, butternut squash originated here in Massachusetts only in the 1940s. It was the brainchild of Charles Leggett of Stow, in Middlesex County. Leggett was an avid farmer and amateur plant breeder.

He loved squash but wanted to produce a variety that was not too big and not too small. He wanted a gourd that had, his wife Dorothy later remembered, “a compact, regular form and flesh that was easier to prepare.”

If you have ever tried taking the stringy goop and seeds out of a pumpkin only to find very little pumpkin left, you’ll know why he wanted something easier to prepare than that. In contrast, the innards of Leggett’s butternut squash come out easily, leaving lots of lovely edible flesh to work with.

To create his hybrid, Leggett crossbred a gooseneck squash with other varieties until he had a squash he liked. He brought it to the Waltham Field Station of the Massachusetts College of Agriculture (known far and wide as Mass Aggie), which is now part of the University of Massachusetts.

He presented his creation to the scientists there under the name Butternut because it was, in his words, “smooth as butter, sweet as a nut.” In Waltham, Robert F. Young, a professor at the college, tinkered with it and named it Waltham Butternut Squash.

I don’t imagine Leggett was pleased that the station put its name on the squash instead of his, but at least he had the satisfaction of seeing his squash become popular both domestically and abroad. It’s grown as far away as New Zealand.

In this country it is raised in almost every state, including Florida. The top producer is Michigan. I’m certainly glad it’s still grown here in Massachusetts. It tastes delicious and stores well. And it makes excellent risotto.

So … here is my recipe. I started with a formula given to me years ago by Laurel Ritmiller Lucrezia of Boston. I then added and subtracted ingredients until I was happy.

This recipe calls for tiny pieces of butternut squash so one needs to peel the squash. (When I roast it halved, I just scoop out the flesh after cooking; there’s no need to peel before cooking.) This can be a little tricky, but it’s not undoable.

First, cut the stem and the bottom off the squash. Cut it in half lengthwise, and scoop out the middle gunk. (There’s not a lot of that, thanks to Leggett.)

If you have a sharp vegetable peeler, use that to scrape off the skin of the squash. My peeler is quite old and a bit dull so I started with it and then switched to a sharp knife. It didn’t take long to get rid of the outer skin of the squash.

A note about herbs: I tend to think that sage is the ideal herb to accompany this type of squash. However, one of the people I was serving when I made this dish was not a fan of sage. Consequently, I used parsley for flavor and color in the risotto and then had sage available to sprinkle on top. Both were tasty.

Choose the herb that appeals to you most. I should think thyme might be handy, or even rosemary, but I haven’t tried them in the risotto. If you want to experiment, try my method of having them available for sprinkling at the table.

Whatever herb you use, you’ll end up with a colorful risotto. Roasting the squash pieces and adding them at the last minute lends texture and flavor to your meal.

Happy Thanksgiving to all!

Butternut Squash Risotto

Ingredients:

1-1/2 cups squash, cut into 1/2-inch cubes (more or less)
extra-virgin olive oil, salt, and pepper as needed
4 cups chicken stock
1/4 cup (1/2 stick) sweet butter plus another 2 tablespoons later
2/3 cup chopped onion
1 small red or yellow bell pepper, seeded and diced
1-1/4 cups Arborio or long-grain rice
1 cup white wine
2 tablespoons chopped herbs
grated parmesan cheese to taste (start with 1/2 cup)

Instructions:

Preheat the oven to 400 degrees. Place the squash pieces in a bowl. Splash a generous drizzle of the oil on top, along with salt and pepper to taste. (I used about 3/4 teaspoon salt and 7 twists of my pepper grinder.) Toss.

Place the oiled and flavored squash on a rimmed cookie sheet. (I lined my sheet with aluminum foil for easy clean up, although some might consider this wasteful.)

Pop the sheet into the oven and roast the squash pieces, stirring every 5 to 10 minutes, until they begin to brown around the edges. This will probably take around a half hour, but timing may vary.

While the squash roasts, start the risotto. Place the stock in a saucepan over low heat.

In a heavy saucepan over moderate heat melt 1/4 cup butter and add the onion and bell pepper. Cook, stirring, for 5 minutes. Add the rice. Cook for 1 minute. Toss in a little salt (maybe 1/2 teaspoon).

Add 3/4 cup of the wine and stir. Add 1 cup of stock and keep stirring.

As the mixture cooks and the rice dries up, add the remaining stock a bit at a time. Cooking will take quite a while—somewhere between half an hour and 45 minutes.

In my experience, the only sure-fire way to know whether risotto is done is to taste it from time to time. It’s ready when it is no longer crunchy and sort of creams in your mouth. If you think you need more salt, add it toward the end of cooking after tasting.

If you run out of stock as you stir, add a small amount of water. If you don’t use all the stock, that’s fine, too! Every batch of risotto is slightly different.

Just before serving, stir in the roasted squash, the herbs, the remaining wine, the last bit of butter, and the parmesan.

Serves 6.